laptop on a small center table
laptop on a rolling cart

laptop on a small center table
laptop on a rolling cart
Ben Edelman - Last updated: July 18, 2013
In discussion-style classes, instructors widely use chalkboards to note, organize, and preserve student remarks. This page offers a more flexible electronic alternative.
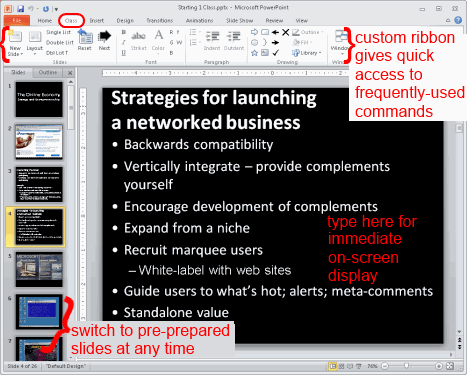
The basic concept is to use a laptop to let the instructor see and use an editor with all required functions (formatting, navigation between screens, etc.) while students see a simplified viewer with only substantive material. This page offers an implementation of that approach using a standard Windows laptop with a custom PowerPoint add-in.
instructor view (on laptop screen)
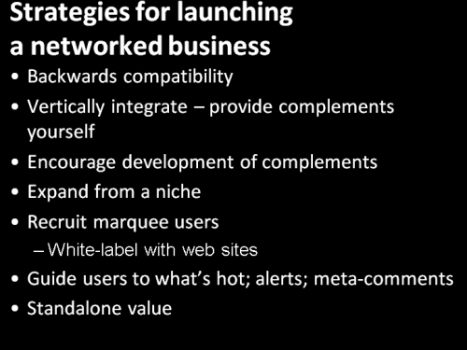
student view (on projector)
Readability. On-screen notes offer a standard typeface that is easily read. In contrast, writing on a chalkboard tends to be messy -- often, less legible than writing on paper due to the unusual angle required when writing on a vertical surface.
Speed. An instructor can add text to on-screen notes at touch-typing speed. For many typists, this is significantly faster than writing on a chalkboard -- especially when making an effort to achieve neat and legible handwriting.
Distribution. On-screen notes can be presented on any available projector or, if needed, multiple secondary displays. In a suitable room, these displays can be seen by a group of any size.
Flexibility. On-screen notes include all the efficiencies of modern software. Reorder items using shortcut keys. Add formatting such as colors, fonts, underlining, and strikethrough. With advance planning, use custom layouts (2x2 matrix, 3x3 matrix, tables, charts, etc.) as needed. Change from on-screen notes to prepared slides, and back, with a single click.
Student focus. By placing the teaching computer in an appropriate section of the room, the instructor can continue to face the group even while writing notes. Instructors who touch-type can continue to look at a student while capturing the student's remarks onto discussion notes, using eye contact and physical cues to influence discussion flow. In contrast, a chalkboard requires turning away from the class to write, and a chalkboard typically requires walking to the far edge of a room where the board is affixed.
Retention. On-screen notes can be saved to disk, posted to a course web site, and redistributed. Students can be provided with electronic copies, if desired. Full-text search is straightforward.
Accommodate students with special needs. A sight-impaired student can receive on-screen notes via an oral screen-reader (connected to an ear-piece for that student) or a custom display (with size and placement to suit the student's requirements). Integration with a braille device should also be possible but has not been tested.
Accommodate instructors with special needs. Using a chalkboard requires pressing chalk firmly against the board, which causes or exacerbates certain hand and wrist injuries.
Flexibility. With current tools, some on-screen layouts are difficult. For example, it is easy to draw an arrow on a chalkboard, but harder to do so in real-time, standing, using the tools offered on this page. More generally, diagrams tend to require more planning using on-screen tools -- at best, calling for an instructor to prepare a diagram template in advance; but some diagrams don't immediately lend themselves to being developed on-screen.
Dependence on typing. An instructor must be able to type quickly and reliably to use this tool effectively. Ideally, the instructor should be able to touch-type (without looking at keys) to maintain eye contact without students. Ideally, the instructor should be able to type without shifting mental focus from substantive matters.
Dependence on shortcut keys. To use this tool effectively, an instructor should establish at least intermediate knowledge of PowerPoint shortcut keys for text editing and slide editing. (See shortcut key tips below.)
Reliability. Because this tool uses a custom template, a software application, a computer, a projector, and (in many rooms) switching/control systems to connect the computer to the projector, there are multiple possible points of failure. Instructors should test in advance and devise a backup plan in case of problems.
Easily-read high-contrast type. Use a simple layout with words easily read. I suggest a sans serif font in simple white on a simple black background, with no distractions or other design elements whatsoever. A black background also helps to avoid the excessive brightness (distracting and unduly eye-catching) that can result when a projector displays a bright white screen. Note that this design broadly matches white chalk on a black chalkboard. My template uses this approach.
Use the full slide, up to the borders. Adjust the slide template to make full use of all available space. Well-designed classrooms, with permanently-installed projectors and screens, project the entire slide without truncation at the edges. There is no need to leave a large border at the edge of the slide. In addition, it may be unnecessary to leave a large gap between slide title and body text. My template has been customized to make full use of available space.
Alternative slide layouts available . A single bulleted list is the natural default. But some concepts call for double-lists, triple-lists, or various tables and grids. My template offers all of these.
Pre-prepared materials where appropriate . It is often helpful to combine discussion (memorialized in on-screen discussion notes) with prepared material (perhaps basic facts from reading, which should be reviewed in a portion of discussion; or an instructor's personal thoughts and interpretation to close the class). A single session can combine both methods, and a single file can include both blank slides (to be filled with discussion notes during class) and prepared materials (to be shown as is).
Obtain a standard Windows laptop. It should be responsive and reliable. Consider a laptop dedicated to classroom use, not used for other purposes. A desktop computer is also satisfactory if the computer has two or more video outputs. (However, a standard desktop computer with a single video output will not suffice because it cannot provide separate displays to the class versus to the instructor.)
If you prefer to be seated while teaching, you can use your laptop's built-in keyboard and pointing device (though an external mouse may improve speed for mouse functions).
If you stand while teaching, an external keyboard, mouse, and keyboard are crucial in order to let you use the laptop comfortably and efficiently while standing. I favor a keyboard that has full-size keys (for fast and reliable typing) but no numeric keypad (which is unnecessary in this context, serving only to take up space and, often, stick out awkwardly). I suggested the Adesso ACK-595UB. It is crucial to mount the keyboard on a stand for comfortable use while standing. I use a Fellowes Copyholder. (The top of the keys face the students, with the back of the keyboard nearest to the instructor's legs.) In the image at right, the keyboard stand is visible just below my hands.
Consider mounting the computer on a suitable stand so you do not need to look down (or not down as sharply) to check on-screen display. I use a 3M Vertical Notebook Riser (at the front of the teaching table in the image at right). Be sure to position the stand to avoid blocking eye contact with students.
Prepare the computer operating system and other applications: Make sure all pop-ups (instant message notifications, email notifications, calendar notifications, operating system updates, security updates, and the like) are disabled, as they could interrupt during class.
Install Microsoft Office 2010 (or later). Specifically, install PowerPoint. Other Office applications are not needed.
Download and install my Board Notes PowerPoint Add-In. Download here. By default, PowerPoint stores add-ins in the folder C:\Users\{username}\AppData\Roaming\Microsoft\AddIns , so I suggest saving the add-in there. (However, folder versions can vary depending on what version of Windows you are running, so your add-in folder may be elsewhere.) To install the add-in, open PowerPoint and choose File - Options, then click Add-Ins. At the bottom of the window, at the heading marked Manage, change to PowerPoint Add-Ins. Press Go. Select the boardnotes-addin.ppam file (finding it in another folder if needed). Accept any security confirmations.
The add-in is required in order to synchronize the editor window (where an instructor creates and edits material) with the viewer window (which students see). Without the add-in, the instructor and students would see different slides -- requiring the instructor to manually advance student slides, which would be slower and error-prone.
Download and install my Board Notes Template. Download here. By default, PowerPoint stores templates in the folder C:\Users\{username}\AppData\Roaming\Microsoft\templates , so I suggest saving the template there. The template is optional but desirable in that it implements the design principles listed above.
I offer this add-in and template for perpetual noncommercial use by instructors at non-profit educational institutions. For other uses, please contact me to request a license suitable to your needs.
Create a new file using the Board Notes Template. In PowerPoint, choose File - New, then click on My Templates. You should see the Boardnotes-template file in the list of Personal Templates. Alternatively, use Windows Explorer to find the folder where you saved the boardnotes-template.potx file; double-clicking the template will automatically create a new file based on the template.
As you plan your class, customize your teaching file as appropriate. As you plan the sections of class discussion and the types of class notes you expect to prepare, consider creating a placeholder slide for each discussion section. Choose slide templates appropriate to the type of discussion -- for example, a bulleted list for simple brainstorming, but a double-list when comparing two alternative perspectives or two possible courses of action. Remove unneeded slides from the template.
Connect the computer to the projector. Be sure the computer is set to "Extend" its display to the projector screen, not to "Duplicate" (which is often the default). On Windows 7, press Windows+P, then choose Extend.
After your projector is connected and the Extend mode is enabled, open PowerPoint. (If PowerPoint is already open, then close it and reopen it so PowerPoint notices the changed display settings.) In PowerPoint, open your teaching file and go to the Slide Show tab. In the Monitors view, be sure "Show On" is set to your projector (which may be listed on some other name such as "External Display" or "Crestron") and make sure "Use Presenter View" is unchecked. These settings will generally be retained for future uses.
Test projector, computer, and software comfortably in advance. Before each class, be sure to budget time for connecting and testing the computer, external keyboard and mouse, keyboard stand, and any other required equipment.
If possible, place the computer so that you can maintain eye contact with students while they are speaking. In the semicircular classrooms standard at my institution, I prefer to teach from the center of the room. Photo 1, 2.
PowerPoint offers numerous shortcut keys which let an instructor activate common functions quickly and without looking at the screen (to check mouse position). Shortcut keys are listed in PowerPoint's Help and in online references. I most often use the following shortcut keys:
F5; Start Presentation Control+M New slide Control+Enter Next text box
(or if cursor is already in last box, next slide; or if cursor is already in last slide, create a new slide)Escape Exit editing of text box Tab and Shift+Tab Next/prior text box Shift+Alt+Up / Down Reorder paragraph up/down Shift+Alt+Left / Right Promote/demote paragraph Control+Shift+< Control+Shift+> Make font smaller/bigger Control+spacebar Remove formatting Control+L/E/R Left/Center/Right alignment Control+B Bold, Italic, Underline Control+I Italic Control+U Underline
The Board Notes PowerPoint Add-In Template organizes frequently-used classroom functions into a new Class tab. To access the tab, press Alt-C. Popup labels will then note the shortcut keys to access other functions on the tab. Even if you do not learn shortcut keys, the Class tab greatly reduces the number of clicks required to activate needed functions -- keeping all in-class functions on a single tab, eliminating switching between tabs during class.
If your classroom features multiple projectors, it may be possible and desirable to use all of them for on-screen notes. For example, you could prepare one screen of notes, then keep that material visible while preparing additional notes on another subject.
In general, a single laptop can output only a single screen of content, necessitating that all projectors show the same thing (undesirable for this purpose). But most modern projectors can "freeze" a screen -- continuing to present that material even if the source changes. Some users may be able to configure a laptop with multiple video outputs to connect to multiple projectors simultaneously, although this also requires additional software customizations to direct separate material to each output and to control the contents of each display. Other options are also available, and methods vary from room to room.
Feel free to contact me to discuss what I have learned in the rooms I have used.
The PowerPoint-based template can be limiting, particularly for instructors who seek arrows, connectors, and other links between entries. I tend to use character-level formatting (bold, underline, italics, color, and sometimes font size) for emphasis. These are often a reasonable, though imperfect, substitute for lines and arrows.
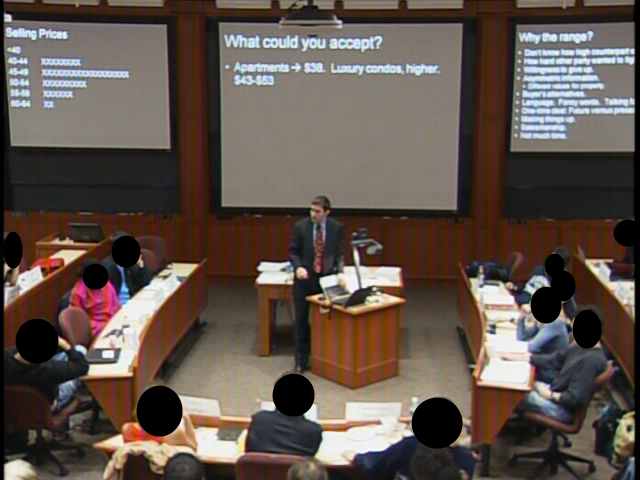
 When planning a class discussion, I try to identify sections where novel layouts are useful. For example, when polling student views, consider a layout that creates one horizontal bar for each option, with simple characters (perhaps "x" or "|") to roughly count student support for that approach. The workflow for creating such a slide, on the fly, is straightforward: In the standard slide template (bulleted list), backspace out the bullet to cancel bulleting. Type a one-word summary of the option's name, then tab, then count the amount of support (using an unobtrusive marker as desired). Press enter and repeat for each additional option.
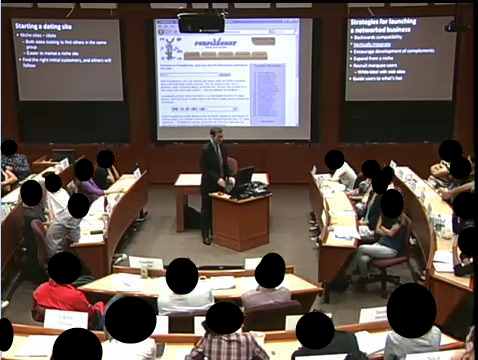
The resulting layout is visible in this snapshot of the tool in use (left projector) and in the inset image at right.
When planning a class discussion, I try to identify sections where novel layouts are useful. For example, when polling student views, consider a layout that creates one horizontal bar for each option, with simple characters (perhaps "x" or "|") to roughly count student support for that approach. The workflow for creating such a slide, on the fly, is straightforward: In the standard slide template (bulleted list), backspace out the bullet to cancel bulleting. Type a one-word summary of the option's name, then tab, then count the amount of support (using an unobtrusive marker as desired). Press enter and repeat for each additional option.
The resulting layout is visible in this snapshot of the tool in use (left projector) and in the inset image at right.
Similar techniques can present myriad alternative on-screen displays, even within the confines of the template's text-based layout.
For some years, I brought my laptop and required cables and accessories in a laptop bag, and connected them appropriately in class each day. This worked fine but gets tiresome -- half a dozen steps or perhaps more.
More recently, I bought a teaching cart which holds all equipment in exactly the cofiguration I prefer. I secured all cabling neatly with velcro straps, and with all wires internal preconnected, I need only connect a power cable and a video cable each day, saving me several minutes of setup and takedown. An additional benefit if that a customizable table can put the screen and keyboard at the height you find most effective.
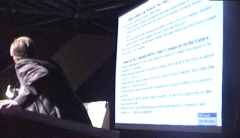 The approach described on this page draws on "scribing" I first used to support a moderated discussion by Lawrence Lessig at IFWP-Geneva (discussions leading to the formation of ICANN). See photo at right showing the early on-screen display with Lessig in the far foreground.
I refined on-screen note-taking systems with guidance from Jonathan Zittrain, using it in his classes, Berkman Center events, and the first twelve ICANN meetings. Throughout, the system always called for at least two separate operators -- an instructor moderating oral discussion, plus a second person controlling on-screen display.
Beginning in 2007, I made adjustments to accommodate a single instructor preparing notes during the instructor's own classes. Willis Emmons provided invaluable guidance on overall strategy. Matt Briggs proposed the white-on-black color scheme and improved classroom layout.